Associate Robin Farrell and I recently completed a full food-photography session for Reddy Wings, a new franchise opening soon in Hyattsville, MD. Their menu focuses on air-fried wings, salmon bites, baked potatoes and freshly made juices and smoothies—a healthier approach that stands in sharp contrast to the heavy oil frying I once knew well from my restaurant-management days with pressure fryers and 15-pound vats of cooking oil.
In a future post, I’ll share the final images—and possibly a behind-the-scenes video. I always release finished work to the client before using it in my own marketing, so for now I’m offering a look at what it takes to photograph food on location at a high professional standard. Equipment needs vary, but this setup is typical.
Lighting equipment
Because the beverages are served in a variety of clear cups and glasses, I used vertical strip lights on both sides of the set to create clean edge highlights. In order to illuminate the contents without harsh reflections, large front reflectors bounced soft light back into the drinks.
For both beverages and food (wings, salmon bites, and baked potatoes), we needed angles from overhead and front-facing. This required two camera positions: one on a tripod in front, and another mounted on a boom arm above the set.
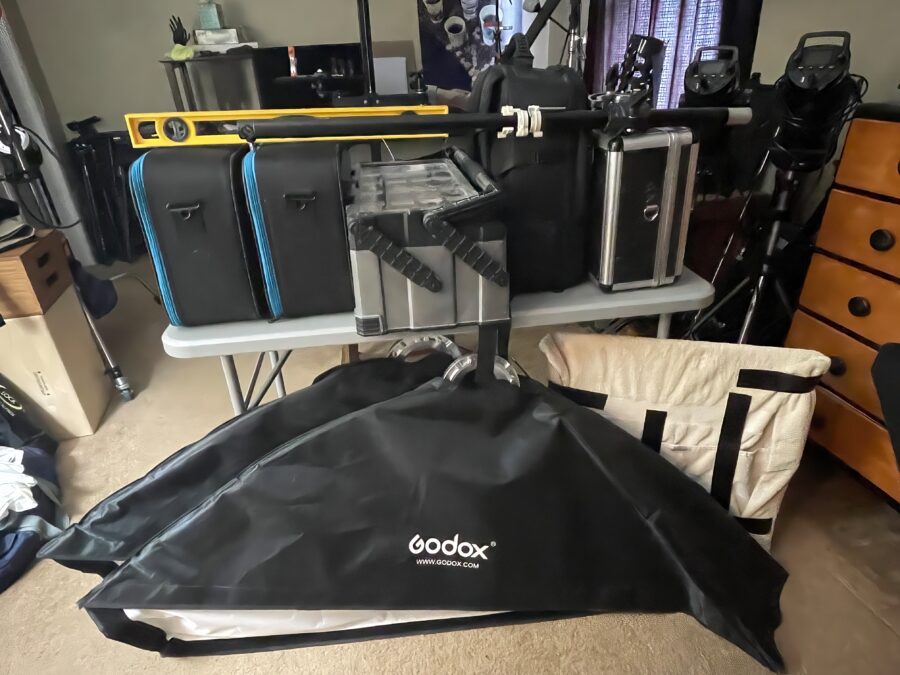
On the table, left to right:
• Case containing one Godox AD600, two AD200s, and spare batteries
• A second case with DJI RSC2 gimbal for Fuji X-T3 video
• Food-styling kit with tools for prepping items on set
• Backpack with two AD300s, batteries, chargers, and a Godox snoot with grid
• Clamps case (approx. 40 lbs): gaffer’s tape, A-clamps, super clamps, and
hardware
• Boom arm and a yellow level/yardstick for setting product alignment
• Two Duo Boards wrapped in towels, used as backdrop surfaces
• 10×50” strip lights, used vertically for cup edges and horizontally for food
(grids removed to avoid reflections). Used with AD300 lights. Not pictured: 33″ lantern modifier.
Primary camera equipment
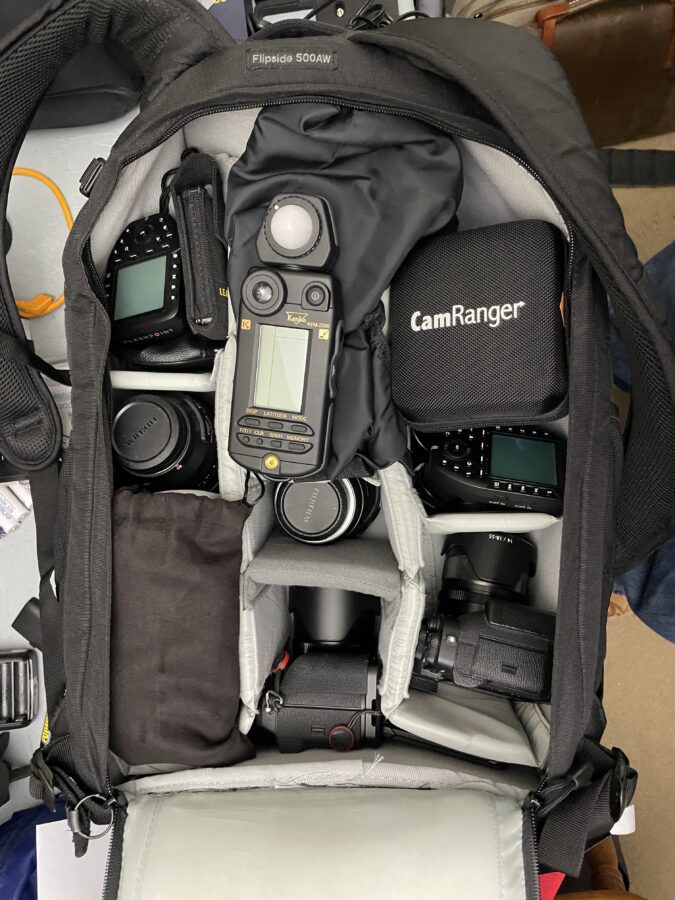
Starting bottom left and rotating through the layout:
• Power bank, plus spare batteries and SD cards (under power bank)
• Fuji 80mm f/2.8 Macro
• Godox remote transmitter, multi-tool, small ball head for boom
• Kenko 2200 light meter and black scrim cloth
• Fuji X-T5 with 16–55mm f/2.8 (under the scrim)
• Viltrox 13mm f/1.4
• Fuji X-T5 with 23mm f/1.4
• ColorChecker Passport
• Fuji X-T3 with 18–55mm f/2.8–4 for video
• Second Godox transmitter, CamRanger WiFi tether
• Fuji 50–140mm f/2.8 (beneath the tether gear)
• Not pictured: iPad Pro for tethered shooting via CamRanger
Have a detailed plan for the session
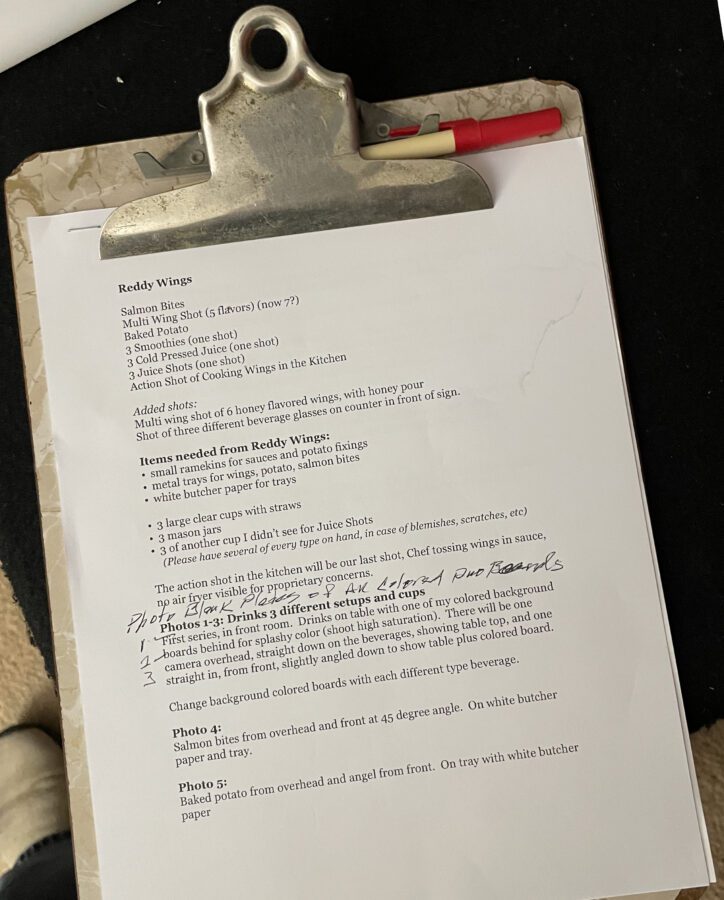
The third photo shows page one of our shooting script, including a handwritten reminder to capture blank Duo Board plates in case they’re needed for compositing later. Because we had nine sets planned, the detailed script helped us move quickly and efficiently—especially important since the location was nearly two hours from our office.

Photo 4: Lighting Diagram of setup for first 6 photos
Prepare a script for the assignment
Timeline & Workflow
• 11:30 AM: Arrival
• 11:30–12:45: Setup and lighting checks
• 1:00 PM: First scheduled photo
• 1:00–6:15 PM: Capture of all 9 setups, photographed from multiple angles and cameras
• 6:15–6:45 PM: Breakdown and packing
• 7:00 PM: Depart for home
Due to the number of setups, the combination of preparation, checklists, and clearly defined lighting plans kept the entire shoot running smoothly and on time.
As the marketing director commented as I showed her the first photo once the testing was done. “Oh my! You can’t do that on an iPhone!”
Looking for professional photographic services? Give Jeff Behm Photography a call at 724-730-8513 or email jeffbehm@behmphoto.com. We’d love to be of service!